Welcome to the comprehensive guide on creating a Progressive Web App (PWA) with Next.js. By the end of this article, you will have a thorough understanding of integrating PWA features into your Next.js application. Let’s dive deep into the world of Next.js and PWAs! 🌊
What is Next.js? 🤔
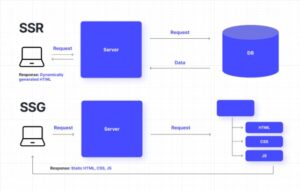
Next.js is a powerful React framework that enables you to build server-side rendered (SSR) and statically generated web applications with ease. Some of the key features of Next.js include:
- Automatic Static Optimization: It automatically optimizes static content to ensure faster load times.
- API Routes: Next.js allows you to create API endpoints as serverless functions, making backend logic integration seamless.
- File-based Routing: This feature simplifies routing by allowing you to create files in the ‘pages’ directory, which automatically become routes.
- Built-in CSS Support: Next.js supports CSS and Sass out of the box, enabling easy styling of your application.
What is a PWA? 🌐
A Progressive Web App (PWA) leverages modern web technologies to deliver an app-like experience through the web. Key characteristics of a PWA include:
- Offline Capabilities: PWAs can function without an internet connection by caching essential resources.
- Push Notifications: PWAs can send timely updates to users, enhancing engagement.
- Installable: Users can add PWAs to their home screen and launch them like native apps.
- Improved Performance: PWAs are designed to be fast, providing a smooth and responsive user experience.
Why Combine Next.js with PWA? 🔗
Combining Next.js with PWA features allows you to build robust, performant, and modern web applications that can reach users even in low or no network conditions. This combination leverages the best of both worlds: Next.js’s server-side rendering and static generation with the offline capabilities and enhanced user experience of PWAs.
Setting Up the Project 📦
To start, let’s set up a new Next.js project.
- Initialize a Next.js App:
Open your terminal and run the following command to create a new Next.js project:
npx create-next-app@latest my-next-pwa
cd my-next-pwa
Install Dependencies:
Next, install ‘next-pwa’ to add PWA support to your Next.js app.
npm install next-pwaConfiguring Next.js for PWA 🌟
Now, let’s configure our Next.js app to support PWA features.1 Create next.config.js:
Create or update your ‘next.config.js’ file to include the ‘next-pwa’ configuration.
// next.config.js
const withPWA = require('next-pwa')({
  dest: 'public',
  disable: process.env.NODE_ENV === 'development',
});

module.exports = withPWA({
  // Next.js config options here
});
2.Add manifest.json:
Create a ‘public/manifest.json’ file to define your PWA’s metadata.
{
  "name": "My Next.js PWA",
  "short_name": "NextPWA",
  "description": "A Progressive Web App built with Next.js",
  "icons": [
    {
      "src": "/icons/icon-192x192.png",
      "sizes": "192x192",
      "type": "image/png"
    },
    {
      "src": "/icons/icon-512x512.png",
      "sizes": "512x512",
      "type": "image/png"
    }
  ],
  "start_url": "/",
  "background_color": "#ffffff",
  "theme_color": "#000000",
  "display": "standalone"
}
3.Service Worker Setup:
The ‘next-pwa’ package handles service worker setup automatically. By default, it creates a service worker to cache files and provide offline capabilities.
Adding Icons 🖼️
To give your PWA a professional look, you should add icons. Place your icons in the public/icons directory. Here are some example sizes:
- icon-192×192.png
- icon-512×512.png
You can create these icons using various tools available online or design them yourself using graphic design software.
Customizing the Offline Page 📄
Creating a custom offline page ensures that users see a meaningful message when they are offline.
1.Create _offline.js:
// pages/_offline.js
export default function Offline() {
  return (
    <div>
      <h1>You're offline</h1>
      <p>Check your internet connection and try again.</p>
    </div>
  );
}
2.Add _app.js:
Next, update your _’app.js’ to handle offline routes.
// pages/_app.js
import '../styles/globals.css';

function MyApp({ Component, pageProps }) {
  return <Component {...pageProps} />;
}

export default MyApp;
3.Update Service Worker Configuration:
Modify the service worker configuration to handle the offline page.
// next.config.js
const withPWA = require('next-pwa')({
  dest: 'public',
  disable: process.env.NODE_ENV === 'development',
  runtimeCaching: [
    {
      urlPattern: /^https?.*/,
      handler: 'NetworkFirst',
      options: {
        cacheName: 'offlineCache',
        expiration: {
          maxEntries: 200,
        },
        networkTimeoutSeconds: 15,
      },
    },
    {
      urlPattern: /\/_offline/,
      handler: 'NetworkFirst',
      options: {
        cacheName: 'offlinePage',
      },
    },
  ],
});

module.exports = withPWA({
  // Next.js config options here
});
Implementing Push Notifications 🔔
To add push notifications to your PWA, you’ll need a service like Firebase Cloud Messaging (FCM). Here’s a basic setup:
1 .Install Firebase:
npm install firebase2.Firebase Initialization:
Create a ‘firebase.js’ file in your project to initialize Firebase.
// firebase.js
import firebase from 'firebase/app';
import 'firebase/messaging';

const firebaseConfig = {
  apiKey: "YOUR_API_KEY",
  authDomain: "YOUR_AUTH_DOMAIN",
  projectId: "YOUR_PROJECT_ID",
  storageBucket: "YOUR_STORAGE_BUCKET",
  messagingSenderId: "YOUR_MESSAGING_SENDER_ID",
  appId: "YOUR_APP_ID"
};

if (!firebase.apps.length) {
  firebase.initializeApp(firebaseConfig);
}

const messaging = firebase.messaging();

export { messaging };
3.Request Notification Permission:
Add a function to request notification permission in your app.
// request-permission.js
import { messaging } from './firebase';

export const requestNotificationPermission = async () => {
  try {
    await Notification.requestPermission();
    if (Notification.permission === 'granted') {
      const token = await messaging.getToken();
      console.log('Notification permission granted. Token:', token);
    } else {
      console.error('Notification permission denied.');
    }
  } catch (error) {
    console.error('Error requesting notification permission:', error);
  }
};
4.Handle Notifications:
Add logic to handle incoming notifications.
// firebase-messaging-sw.js
importScripts('https://www.gstatic.com/firebasejs/8.6.1/firebase-app.js');
importScripts('https://www.gstatic.com/firebasejs/8.6.1/firebase-messaging.js');

firebase.initializeApp({
  apiKey: "YOUR_API_KEY",
  authDomain: "YOUR_AUTH_DOMAIN",
  projectId: "YOUR_PROJECT_ID",
  storageBucket: "YOUR_STORAGE_BUCKET",
  messagingSenderId: "YOUR_MESSAGING_SENDER_ID",
  appId: "YOUR_APP_ID"
});

const messaging = firebase.messaging();

messaging.onBackgroundMessage((payload) => {
  console.log('Received background message: ', payload);
  const notificationTitle = payload.notification.title;
  const notificationOptions = {
    body: payload.notification.body,
    icon: '/icons/icon-192x192.png',
  };

  self.registration.showNotification(notificationTitle, notificationOptions);
});
Optimizing Performance with Caching 🏎️
PWAs can cache assets to improve performance and ensure content is available offline. Let’s optimize caching in our Next.js PWA.
1.Add Runtime Caching:
Customize the ‘next-pwa’ configuration to include runtime caching.
// next.config.js
const withPWA = require('next-pwa')({
  dest: 'public',
  disable: process.env.NODE_ENV === 'development',
  runtimeCaching: [
    {
      urlPattern: /^https:\/\/fonts\.(?:googleapis|gstatic)\.com\/.*/i,
      handler: 'CacheFirst',
      options: {
        cacheName: 'google-fonts',
        expiration: {
          maxEntries: 4,
          maxAgeSeconds: 365 * 24 * 60 * 60, // 1 year
        },
      },
    },
    {
      urlPattern: /^https?.*/,
      handler: 'NetworkFirst',
      options: {
        cacheName: 'http-cache',
        expiration: {
          maxEntries: 200,
        },
        networkTimeoutSeconds: 15,
      },
    },
  ],
});

module.exports = withPWA({
  // Next.js config options here
});
2.Cache API Responses:
Cache API responses to improve performance and provide offline access.
// next.config.js
const withPWA = require('next-pwa')({
  dest: 'public',
  disable: process.env.NODE_ENV === 'development',
  runtimeCaching: [
    {
      urlPattern: /^https:\/\/api\.example\.com\/.*/i,
      handler: 'NetworkFirst',
      options: {
        cacheName: 'api-cache',
        expiration: {
          maxEntries: 50,
          maxAgeSeconds: 24 * 60 * 60, // 1 day
        },
        networkTimeoutSeconds: 15,
      },
    },
    {
      urlPattern: /^https?.*/,
      handler: 'NetworkFirst',
      options: {
        cacheName: 'http-cache',
        expiration: {
          maxEntries: 200,
        },
        networkTimeoutSeconds: 15,
      },
    },
  ],
});

module.exports = withPWA({
  // Next.js config options here
});
Enhancing User Experience with Background Sync 🔄
Background Sync allows your PWA to complete tasks in the background when connectivity is restored. This feature enhances user experience by ensuring data consistency.
1.Install Background Sync Plugin:
npm install workbox-background-sync2.Configure Background Sync:
Update your service worker to include background sync.
// public/sw.js
import { registerRoute } from 'workbox-routing';
import { NetworkOnly } from 'workbox-strategies';
import { BackgroundSyncPlugin } from 'workbox-background-sync';

const bgSyncPlugin = new BackgroundSyncPlugin('postQueue', {
  maxRetentionTime: 24 * 60 // Retry for up to 24 hours
});

registerRoute(
  /\/api\/.*\/*.*/,
  new NetworkOnly({
    plugins: [bgSyncPlugin]
  }),
  'POST'
);
3.Update ‘next.config.js’:
Ensure your service worker file is included in the build.
// next.config.js
const withPWA = require('next-pwa')({
  dest: 'public',
  disable: process.env.NODE_ENV === 'development',
  register: true,
  skipWaiting: true,
});

module.exports = withPWA({
  webpack(config) {
    config.plugins.push(
      new webpack.DefinePlugin({
        'process.env.SERVICE_WORKER': JSON.stringify('/sw.js'),
      })
    );
    return config;
  },
});
Conclusion 🎉
Congratulations! You’ve built a fully functional Progressive Web App with Next.js. Throughout this comprehensive guide, we covered:
- Setting up a Next.js project.
- Configuring Next.js for PWA support.
- Creating a custom offline page.
- Adding icons.
- Implementing push notifications.
- Optimizing performance with caching.
- Enhancing user experience with background sync.
By combining the power of Next.js and PWA technologies, you have created a modern, performant, and resilient web application. Keep exploring and adding more features to your PWA to make it even better. Happy coding! 👩💻👨💻